Thursday, June 30, 2011

Freezing Fire Roasted Tomatoes


I have been up to my ears in summer vegetables.  I've had squash, eggplant, peppers of every color, okra, corn, cucumbers, and tomatoes all make their way through my kitchen in the last few weeks.  One thing I did differently this year was fire roasting my tomatoes before I froze them.


I find myself buying cans of fire roasted tomatoes all throughout the year to put in soups, pastas, chilies--just about anything that calls for canned tomatoes.  I love the deep, smoky flavor they have, so I thought I'd try roasting my own, instead of just blanching and dicing the usual way.  It was actually very easy and I prefer it to other methods.  So here's what I did:


1.  I washed the tomatoes, then dried them.  Then I cut the ends off, then I cut them in half.


2.  I laid them on a large baking sheet that I had sprayed with cooking spray.  For my first batch, I drizzled with extra virgin olive oil, but on all subsequent batches, I left them plain.  I really saw no difference between the olive oiled ones and the ones without.

3.  I set the oven to broil.  I put the pan in the oven on the top rack directly beneath the flame, and I roasted them, being careful to rotate the pan every few minutes for nice, even color.  This took about 20 or so minutes for each batch.  I did not flip them or turn them over.


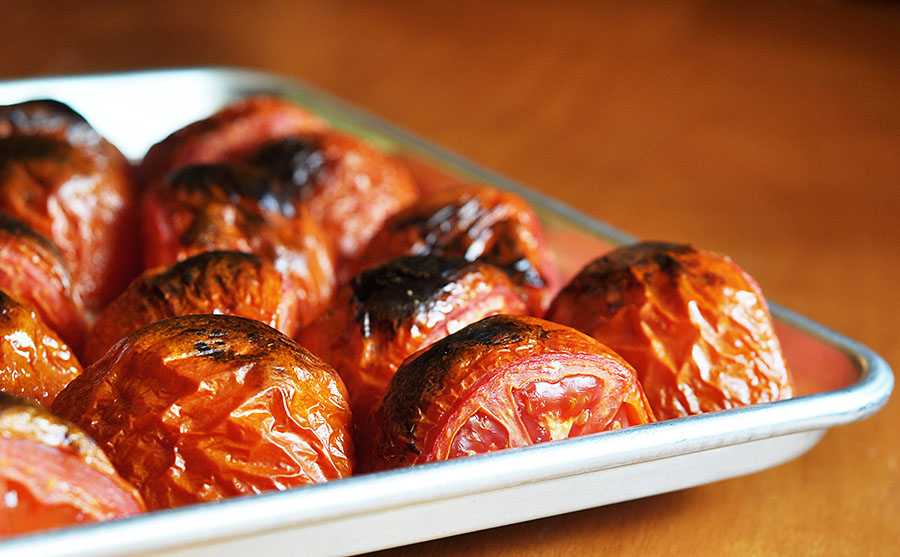
4.  I laid them out on the kitchen table to cool to the touch so I could cut them up.  The skins slipped off very easily, but, and this is a big but, if you'll notice on the back of the store bought can of tomatoes I had, the ingredients said that the tomatoes were canned unpeeled.  This gives those beautiful, black bits dispersed throughout the tomatoes.


Nothing says ""I've been fire-roasted" like those little charred bits.  That's what I've always said, all my life.  Anyway, I left quite a few of the skins on.  But if you are opposed to the skins, they slide off very easily.  I think I've already said that.

Yes, I did.


After they cooled, I chopped them (which, they were soft so it was more of a combination "chop" and "smush"), then put them in a big bowl.  Now, I wanted each bag of tomatoes to be equal to one can of store bought tomatoes, so when I cook I can easily swap out my frozen bags for the cans.  Each can holds about 1 and 2/3 cups, so I filled each bag with that amount.  Then I sealed them and laid them flat to freeze.  Then I proceeded with the rest.

And proceeded.  And proceeded.

And that's it!  Keep in mind that the store bought cans have salt and extra flavors added.  I added nothing to mine.  I could have added some salt, but I didn't.  I'll have to remember this whenever I cook with them.  They're going to need some seasoning up.

I can truthfully say that this was quite a simple and easy process.  Now freezing okra?  That's another story.


Pin It!

Wednesday, June 22, 2011

The Classic Reuben Sandwich


I can do few things well, but one thing I can do well is make a really good Reuben sandwich.  I usually get on a Reuben kick in the summer, probably because we travel through the Blue Ridge mountains then and there is a tiny, quaint town nestled in the mountains in north Georgia called Helen, which has a restaurant that makes the best Reuben sandwich I have ever eaten.   We go there every time we pass through.

The secret to their Reuben is that they marinate their corned beef in something special.  They won't tell me what this special marinade is, though, and believe you me, I have asked on more than one occasion. The secret to my Reuben, however, is the sauce. Don't use bottled Thousand Island dressing; give my sauce a try.  You won't be sorry.  I have been making this sandwich for years, they same way, and everybody loves it.  I mean, yes, my husband is now asking for something else besides this sandwich because this is the fourth day in a row we have been eating them, but still, we love.  We love so much.

The Classic Reuben Sandwich

Special sauce: 
1 cup mayonnaise
1/2 cup ketchup
1/8 teaspoon paprika
1 teaspoon prepared horseradish
3 tablespoons grated onion (don’t forget all that onion juice!)
1 teaspoon Worcestershire sauce
1/2 teaspoon celery seed
Salt and Pepper to taste

Sandwich ingredients: 
Rye bread slices
Swiss cheese slices
Sauerkraut, well drained
Thinly sliced deli corned beef
Softened butter

Stir together all ingredients for the sauce in a medium bowl. 

Lay 2 pieces of rye bread on a cutting board, and spread each piece liberally with sauce.  Place 1 slice of cheese on each piece of bread, then spread a spoonful of sauerkraut on one slice of bread on the cheese.  Layer several pieces on corned beef on the other slice of bread.  Carefully close sandwich. 

Preheat a griddle over low heat until hot.  Spread the top of the sandwich with a small amount of softened butter, then place butter side down on hot griddle.  Butter the other side of sandwich.  Cook until golden brown and cheese is melted, turning once.  Place on a cutting board and let stand for a few minutes before cutting in half. 
  

Pin It!

Wednesday, June 15, 2011

Andy's Onion-Crusted White Perch


I love it when I come across simple, easy recipes like this one.  This recipe comes from a friend of my brother-in-law.  His name is Andy and we were both at a graduation party for my niece, Caroline, a few weeks ago.  He knew I'm a foodie, so he told me about this easy idea for baking fish that he came up with himself.  My brother-in-law, Roger, and Andy are avid white perch fisherman and every spring they pack their freezers full.  In fact, while I was at the party, Roger asked if we wanted a couple of bags of fillets.  Like I am going to turn down free food.  Not even.

This is easy, I mean eas-y, and with only four ingredients you can put it together in no time.

-Line the pan with foil first, Andy said, for easy clean up.

-This recipe would work well with many different types of fish, and is a great alternative to frying.

-Sure, you could put the crushed onions in a bowl, then dip the fish in eggs and coat in crumbs, but then you would be dirtying up two more bowls, right?  Just sprinkle the crumbs on top and you'll get a nice, crunchy crust, I promise.  And you'll have less dishes to do.

-Andy said to brush the fillets with olive oil, but I'm partial to melted butter when it comes to fish.  Either works fine.


-He also said he uses Tony Chachere's Creole seasoning, but I experimented with a couple more of my favorite seasoning blends for variety.


-I added a quick mayonnaise based sauce, optional.  Tartar sauce would be great, too.


Andy’s Onion-Crusted White Perch


About 2 pounds white perch fillets (or other fish)
1/2 melted butter (or extra virgin olive oil)
Creole seasoning, Blackened seasoning, Greek seasoning or other favorite seasoning
1 (6-ounce) bag French fried onions, finely crushed
Lemon slices for squeezing

Easy Creole Sauce:
1 cup mayonnaise
1/2 to 1 teaspoon Creole seasoning
2 tablespoons prepared horseradish

Preheat oven to 350 degrees.  Line a large baking pan with foil and spray with nonstick cooking spray.  Lay fillets out flat and brush with melted butter.  Season with favorite seasoning blend, then sprinkle the tops with the crushed fried onions, patting down slightly.  Bake at 350 for 15-20 minutes or until fish flakes with a fork.

To make the sauce, stir together the mayonnaise, Creole seasoning, and horseradish together in a small bowl.  Serve fish with sauce and lemon slices.  (All measurements are approximate.)

Pin It!

Tuesday, June 14, 2011

Buy Local Produce. It's The Right Thing to Do.

First, Mississippi Kitchen got a makeover and is a much brighter, happier place.  A big thank you and shout out to Michelle at Shabby Creations.  She "saw" what was in my mind and captured it perfectly! Some people are so talented!

And for some strange reason, my comment box is not appearing.  I'm working on the problem and hope to get it solved soon.


After a couple of back to back trips in the past week, I'm finally home and ready to settle into a nice summer rhythm.  I  just need to get unpacked first and go through 400 pieces of mail.   My summer plans this year include putting up copious amounts of fresh vegetables, which I have already started doing.  I usually do a little bit each summer, but this year I'm going all out.  And how fortunate for me that some friends of ours have opened a vegetable farm near by, making my produce shopping much more convenient.  I love it when people do nice things like that for me.

So, before I tackle my mile-high pile of laundry, I want to remind you to support your local vegetable farm.


Now your local vegetable farm may or may not be called Dyess Produce.


It may or may not have a red tractor sitting by the tomato patch.


And it may or may not have a gray horse just over yonder on the other side of the fence, but I'm sure it will have plenty of fresh, beautiful veggies.


And I'll be willing to bet that the prices will be pretty reasonable.  And I think we could all use a break on food prices, don't you agree?

So buy local.  It's just the right thing to do.

The zucchini calls me.  I'll be back soon with a recipe!

Pin It!

Wednesday, June 1, 2011

White Cheddar-Bacon-Pimiento Cheese Stuffed Burgers


For Memorial day I was going to make plain old burgers, but as I was rummaging through my fridge, I saw I had a big block of white cheddar left over from another recipe.  A light bulb went off in my head and  I immediately looked in my cabinet and sure enough, I had a couple of jars of pimiento peppers because I am nothing if not a person who keeps a well-stocked pantry.

A well-stocked pantry is a happy pantry, I always say.

So I threw together a huge batch of white cheddar  pimiento cheese and added some bacon just because it was a holiday.  Delish.  (And may I add that this cheese spread is fantastic with Kettle chips?)


I had 5 pounds of ground chuck, so I made 16 patties.  I layed 8 of them out on a baking sheet and placed a huge, I mean huge scoop of  pimiento cheese spread in the middle of each of them.  It was unfortunate for me that I ignored that teeny, tiny voice in my head that was saying "Lorie, that is WAY too much pimiento cheese spread."

Shhhhhh tiny voice.  I know what I'm doing.


I also didn't listen to that teeny, tiny voice earlier today when I was baking a strawberry cake and filled the pan way too full because I wanted nice, fluffy layers.


Self cleaning an oven when it's a 100 degrees outside and your air conditioner is already working as hard as it can is not fun.


Everything was fine with my giant burgers until I started grilling.  As the meat started shrinking, they burst open and oozed cheesy, white lava all over my brand spankin' new grill.


But, and this is a big but, they were some kind of good.  Everyone absolutely raved.  And I think the recipe can totally be salvaged by using only 4 pounds of meat and a much smaller scoop of cheese spread. 

So here are some things to consider:

-This makes way more pimiento cheese spread than you will need to stuff the burgers.  Cut the recipe in half or don't cut it in half and use it on sandwiches or as a dip.  Or eat it with a spoon straight from the bowl when your husband isn't looking.

-The wine, onion, Worcestershire sauce combo is my basic seasoning for burgers of all kinds.  I usually use a Cabernet Sauvignon.

-I loved the onion-poppy seed ciabatta rolls for the buns.  I like a nice quality bun for burgers even if I only have plain patties.

-I am a home cook and I make lots of mistakes in the kitchen.  Like over-stuffing burgers and over-filling cake pans.  Sometimes, though, my mistakes are delicious.

That is all.


White Cheddar-Bacon-Pimiento Cheese Stuffed Burgers


Pimiento Cheese Spread:
3/4 cup mayonnaise
4 ounces cream cheese, softened
4 heaping cups shredded white cheddar cheese
2 (4-ounce) jars diced pimientos, drained
6 slices cooked bacon that has been finely crumbled
Salt and pepper to taste

Patties:
4 pounds ground chuck
1 small finely chopped or grated onion
 1/2 cup red wine (Cabernet Sauvignon or other)
1/4 cup Worcestershire sauce
4 teaspoons kosher salt
4 teaspoons cracked black pepper

Vegetable oil for brushing on grill rack
8 large good quality buns (I loved onion-poppy seed ciabatta rolls)
Lettuce, onion, tomato slices and condiments

Prepare a medium hot fire in a charcoal grill with a cover, or preheat a gas grill to medium high.

In a large mixing bowl, whisk together the mayonnaise and cream cheese until smooth. Stir in the cheese, pimiento peppers, and bacon.  Add salt and pepper to taste.  (This will make way more than you will need for the burgers.  Makes a great dip or sandwich spread.)

To make the patties, combine the beef, chopped onion, wine, Worcestershire sauce, 4 teaspoons salt, and 4 teaspoons cracked black pepper in a large bowl.  Handling the meat as little as possible, mix well.  Form into 16 equal portions and shape the portions into patties.  Lay 8 patties on a large baking sheet that has been covered in wax paper or foil.  Place a small amount of the pimiento cheese spread (about a tablespoon) in the center of each patty.  Place the remaining patties on top of the cheese and pinch the sides of the meat to seal well.

Brush the grill rack with vegetable oil.  Place patties on grill rack, cover, and cook, turning once, until done to preference, about 5-7 minutes on each side for medium.  Toast buns on grill rack the last few minutes of cooking.  Dress burgers with lettuce, onion, and tomatoes and your choice of condiments.  8 burgers. 


Pin It!