Monday, March 28, 2011

Candied Cranberry Baby Backs

I'm gonna make this short and sweet.  Last year I had the honor of being chosen to compete in a rib cook-off in Lake Tahoe.  You can read all about it here.  Even though I am not the most confident or skilled grillmaster, I managed to pull off the grand prize win.  No one is more surprised by this than me.  And if you say, "No, Lorie, I really am much more surprised than you that you won,"  then I will say right back to you that you are indeed mistaken.  I am the most surprised.  So don't argue with me.

Anyway, Gnarly Head Wines is sponsoring another rib cook-off, so I am trying to dream up yet another entry that might get me invited back.  So while I work behind the scenes concocting marinades and sauces and rubs, here is my winning recipe from 2010.


My Darling Clementine Candied Cranberry Baby Backs


1 (16-ounce) can cranberry jelly
1/4 cup hoison sauce
1 cup fresh Clementine juice (or tangerine or orange juice)
2 teaspoons Clementine zest (or tangerine or orange zest)
3 tablespoons Dijon mustard
3/4 cup firmly packed light brown sugar
1/2 cup apple cider vinegar

2 racks baby back pork ribs (about 6 pounds total), outer membrane removed
Kosher salt for seasoning ribs
Freshly ground black pepper for seasoning ribs

Preheat a charcoal grill to medium heat for indirect grilling. 

Combine the cranberry jelly and the next 6 ingredients in a medium fire proof, heavy saucepan.  Place on the grill over medium heat and cook, stirring often for about 20 to 30 minutes or until sauce thickens.  Set aside.

Season ribs with kosher salt and pepper.  Place on grill and cook for 2 to 3 hours, with the lid closed, rotating the ribs every 15-20 minutes.  The temperature of the ribs should be 155 degrees thermometer is inserted into thickest part.  During the last 30 minutes of cooking, mop the ribs with the glaze on both sides, about every five minutes.  Remove from grill and let rest for about 5 minutes before cutting each rack in thirds.  6 servings.   

Pin It!

Thursday, March 17, 2011

Dirt Cake


I can remember exactly where I was when I first ate dirt cake.  I was in Copeland, Alabama and it was the summer of  1990.

I'm pathetic, I know.

I was at my stepfather's brother's house and he was having a huge get-together.  They were roasting a whole hog, but who really cares because there was dirt cake.  And I had never heard of it before and when I took a bite, I was like "What on earth is this stuff?"

And someone said "Dirt cake."

And then my life had meaning.

Dirt cake is ridiculously rich, but it's so yummy it's almost irresistible.  Or, in my case, it is irresistible.  It's basically crushed Oreo cookies in a vanilla pudding and cream cheese mixture.  I'm not sure why it's called cake.  That part is confusing.  But the recipe is easy.  I got it from a church cookbook years ago.

I usually only make this about once or twice a year, and usually only for events involving children.  This week was perfect because my cousin was visiting with her family, and when we all got together, there were lots of children.

So this was for the children.  Yeah.

Please notice was his shirt happens to say. :o)
 Here are some things to remember:

-I found this milk chocolate rock candy at Wal-Mart, and I used it to decorate the top, as well as placing some of them in the cookie crumb layers (as long as it doesn't touch the actual pudding because it will melt and make the pudding discolored and ugly--I found this out the hard way) to look like rocks in soil.


-And by the way, Wal-Mart has all kinds of cute gourmet candy, in case you haven't visited their candy aisle lately.  Since it just takes a few to worms to decorate, I actually froze all of the gummy worms I bought from the last time I made dirt cake, that way I don't have to go out and buy more.


-I don't like putting worms in the actual pudding, either, because they melt and create a bad flavor and color.  I usually just decorate the top with them.


-The green grass clumps are a tube of green frosting using a #233 grass tip.

-This is better if it chills overnight.  I decorate it right before I serve it.

-I'm sure you've seen this served in a (unused) flower pot with some plastic flowers sticking out of it.  That's another way to present it.  Or little individual flower pots.  Cuteness.  But how about adding some fondant flowers on top?  Or maybe some candy Easter eggs for an Easter dinner dessert?  Lots of different ways to make this special.

Dirt Cake

Printable Recipe

3 1/2 cups whole milk

2 small packages instant French vanilla pudding

1 stick butter, softened to room temperature

1 (8-ounce) package cream cheese, softened to room temperature

1 cup powdered sugar

1 (16-ounce) container non-dairy whipped topping

2 packages chocolate sandwich cookies

Milk chocolate candy rocks

A tube of green frosting

Assorted gummy worms

Whisk the milk and pudding together in a large bowl until smooth.  Let stand five minutes.  In another large bowl, beat the butter and cream cheese together with a hand mixer on medium speed until fluffy.  Beat in the powdered sugar until smooth.  Add the pudding and beat until smooth.  Fold in the non-dairy whipped topping.

Crush 1 package of cookies so that there are some fine crumbs, but also some larger pieces.  There needs to be a variety.  Fold this into the pudding mixture until evenly mixed.

Finely crush the other bag of cookies.  In a large clear glass trifle dish, pour about a third of the pudding mixture into the bottom and spread to smooth.  Sprinkle with a layer of about a third of the finely crushed cookies.  Stick several of the candy rocks in the cookie layer, especially around the perimeter of the dish where they will be visible.  (To look like rocks in the soil.)  Top with another third of the pudding mixture on top of the cookie layer, then repeat with another cookie layer and some more candy rocks.  Spread the remaining third of the pudding on top, then top with the remaining cookie crumbs.  Add clumps of grass in different spots using a grass tip and the green frosting, then place more rocks and gummy worms on top to decorate.  Chill for several hours to overnight before serving.

Pin It!

Friday, March 11, 2011

Homemade Chocolate Syrup


First of all, let me point you in the direction of Small Notebook.  Small Notebook is a beautiful blog about simplifying life, getting organized, and saving money.  That's where I first saw a post about homemade chocolate syrup that caught my eye.  I knew I had to try it.

But why?  Why would someone want to make homemade chocolate syrup?  I can think of three reasons right off hand.

1)  It's probably cheaper than buying store-bought.  I haven't taken the time to analyze the actual cost of homemade versus store-bought myself, but this recipe first ran in Amy Dacyczyn's book The Complete Tightwad Gazette, and there is a cost comparison in there.  From scratch wins by quite a bit. 

2)  It's NOT full of stuff that you can't pronounce.  Now, I like my processed food.  I like my store-bought ice cream and my Taco Bell and my Oreo cookies.  But I have been more concerned about eating processed foods lately, and I am trying to limit the amount I eat.  Yes, I'm trying to limit the amount of sugar I eat too, so chocolate syrup is still a splurge for me. But I had bought a bottle of off-brand chocolate syrup not too long ago, and the first ingredient in the list was high fructose corn syrup.  I had no idea what some of the other ingredients were.

3)  It tastes as good as the canned stuff.  Really!  I didn't think it would.  I really didn't.  But it does.

Here are a few tips if you make this:

-This boils over easy.  Use a medium to large saucepan and watch it.

-I made three versions.  The first version was made with regular Hershey's Cocoa Powder.  The second version was made with Hershey's Special Dark 100 % Cacao Powder, which I am absolutely in love with.


The one on the left was made with regular cocoa powder and the one on the right was made with dark

Personally, I loved the dark the best, but both were delicious.  The third batch was made with Splenda.  I did not like it at all and I'm going to have to work on it to get it right.

-The original recipe in the Tightwad Gazette says that this will keep for months in the refrigerator.  I don't know about months, but I'm sure weeks.

-This syrup is very sweet.  That's not a problem for me, but it may be for some.  I think the sugar could probably be decreased according to taste.

-This syrup gets thicker when it's cold, so don't judge it before it's really cooled.


Homemade Chocolate Syrup

Adapted from The Complete Tightwad Gazette by Amy Dacyczyn


1/2 cup regular cocoa or dark cocoa powder
1 cup water
2 cups sugar
1/8 teaspoon salt
1/4 teaspoon vanilla

Whisk together the cocoa, water, and sugar in a medium heavy bottomed saucepan over medium heat.  Bring to a boil, whisking constantly, and cook for 3 minutes being careful not to let  boil over.   Remove from heat and add the salt and vanilla.   Pour into a sterilized jar and store in refrigerator.  Will keep for several weeks.  


Pin It!

Sunday, March 6, 2011

Classic Chicken Tetrazzini


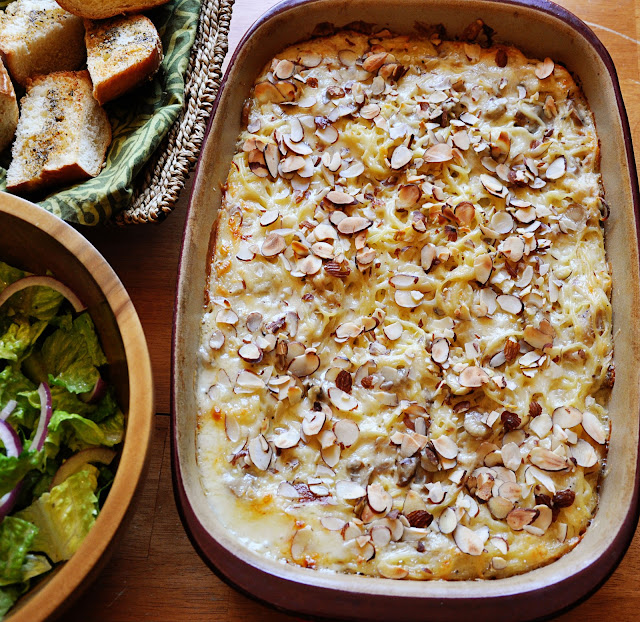
I was thumbing through some recent copies of my Southern Living magazines a few weeks ago, and this recipe caught my eye, mostly because of it's short list of ingredients.  I flagged it but forgot all about it until the other day when I noticed that the huge hunk of Parmesan cheese I had bought at Sam's a while back was looking kind of moldy.  I needed to use it up quick and this recipe was perfect for it.

The verdict?  It was cheesy, pasta goodness on a Sunday afternoon. I don't like to come home from church and face an hour or two of cooking in the kitchen.  I made this the night before and while it baked in the oven, I threw together a simple salad and some garlic bread.  It was just right.  I give this recipe two thumbs up and will definitely be making it again soon.  Like next week when some of my family visits.

Here's some things to consider:

-I made this with all dark meat, and I don't think I put in 4 whole cups, but it was enough.  I've been on a dark meat kick because, my goodness, the flavor.

Plus I had a freezer full of leg quarters that I had bought on sale for 29 cents a pound.  But still, dark meat is delicious.

-I used sliced almonds instead of slivered. No biggie except that they will burn a little bit faster, so watch it if you put this under the broiler like I did for a little bit of golden brown cheesy goodness on top.

-If you don't have white wine you could certainly substitute chicken broth or stock.  I love the flavor the wine gives, though.

-Oh yeah!  The magazine article said this would freeze wonderfully.  I didn't try that, but I would let it thaw overnight in the fridge before baking. 

Classic Chicken Tetrazzini
Slightly adapted from Southern Living


1 1/2 (8-ounce) packages vermicelli
1/2 cup butter
1/2 cup all-purpose flour
4 cups milk
1/2 cup dry white wine
4 chicken bouillon cubes
1 teaspoon coarsely ground pepper
2 cups freshly grated Parmesan cheese, divided
4 cups diced cooked chicken
1 (6-ounce) jar sliced mushrooms, drained
3/4 cup sliced almonds

Preheat oven to 35o degrees.  Prepare pasta according to package directions.

Meanwhile, melt butter in a large skillet with high sides over low heat; whisk in flour until smooth.  Cook 1 minute, whisking constantly.  Gradually whisk in milk and wine; add bouillon cubes and cook over medium heat, whisking constantly, 8 to 10 minutes or until mixture is thickened and bubbly. Stir in pepper and 1 cup Parmesan cheese until melted.
Remove from heat; stir in diced cooked chicken, sliced mushrooms, and hot cooked pasta.   

Spoon mixture into a lightly greased 13 x 9-inch baking dish; sprinkle with sliced almonds and remaining 1 cup Parmesan cheese.  Bake for 30 minutes or until bubbly.


Pin It!