Showing posts with label Cookies and Bars. Show all posts

Thursday, March 27, 2014

Chewy Peanut Butter or Almond Granola Bars


You just can't trust what's in food these days.  Chemicals, hormones, additives, and crazy DNA that shouldn't be there.  I try to cook from scratch as much as possible for my day to day cooking so I know what goes into my food.  A lot of store-bought granola bars claim to be healthy and natural, but they're anything but.

These are my current favorite granola bars.  And let me tell you my favorite way to eat them--straight out of the freezer.  I know, weird, right?  But I actually make a big batch of them and wrap them all separately and store them in the freezer.  (Tip:  I store them in my regular freezer which is set to keep things frozen, but not rock hard like a deep freeze does.  So I can still actually bite into them straight from the freezer.  You might want to adjust your freezer's temperature setting if your ice cream freezes like a brick.)  You can store these at room temperature too.

More and more, I am trying to use organic as much as possible in my everyday cooking, which are things we eat on a regular basis.  I am very limited in my rural area and yes, organic items cost a lot, but I do try.  So if you want to really up the healthy aspect of these, use organic ingredients.  I was excited to see some organic Smucker's natural peanut butter the other day.

PS.  Mississippi Kitchen is getting a makeover and a brand new home.  We have been feverishly working behind the scenes to make this happen, and by we I mean the person I have hired to do all this tedious work.  Stay with me please because some good things are coming soon.  (Like a recipe index, hallelujah!)  I am still here, alive, and cooking up a storm, but trying to hold off a lot of blogging until my transfer is done.  You understand, don't you?  I *knew* you would.  :)


Here are my notes:

--I use both almond butter and peanut butter.  If I make them with almond butter, I use chopped almonds, and if I make them with peanut butter, I use chopped walnuts.  Both of these nut butters will require stirring before measuring.

--I leave the nuts raw because I have read they are better for you this way.  I LOVE the flavor of toasted nuts, but this is a great way to get my share of raw nuts since I don't love eating raw nuts plain.

--I am sure you could use whole oats.  I just usually have quick oats on hand.

--I try to use raw, unprocessed honey which is so much better for you.


--Press the mixture in tightly with the back of a spatula or you can even use the bottom of a measuring cup.

--The chia seeds.  Yes, they are weird but very nutritious.  They form a gel like substance around them when they get wet.  It's strange.


--I have found the easiest way to wrap these is to stick one in a cheap sandwich bag and fold it over, the kind that are not zip lock (because you would use too many and that would be expensive), but fold over  instead.  I think they are sold about a 150 to a box.


Chewy Peanut Butter or Almond Granola Bars

Printable Recipe

5 cups quick oats
1/4 cup chia seeds
2 cups chopped raw walnuts or almonds
8 tablespoons butter
1 cup honey (preferably raw organic)
6 heaping tablespoons natural style peanut butter or almond butter (preferably organic)
1/4 cup light brown sugar
1/2 teaspoon kosher salt
2 teaspoons vanilla
  1. In a large bowl, stir together the oats, chia seeds, and nuts.
  2. Place the butter, honey, peanut butter or almond butter, brown sugar,  and salt in a medium sauce pan over medium heat.  Cook until melted  and smooth, whisking often.
  3. Pour the honey mixture over the oat mixture and stir well.  Line a 13 x 9  inch metal pan with foil and spray with nonstick cooking spray.
  4. Press the mixture well into the bottom of the pan using a spatula.  
  5. Freeze for several hours before cutting into squares.  I like wrap these individually and store them in the freezer.  They can be eaten cold or brought to room temperature.

Pin It!

Wednesday, December 18, 2013

Very Vanilla Chippers


It's funny how I struggle to break out the good stuff.  I had one last vanilla bean from my precious supply and I wanted to make the "right" decision on how to use it.  Vanilla beans are definitely not something I have in my pantry all the time.  They are expensive and a little luxurious to me, so I often wind up just keeping them on the shelf for way too long and dreaming about how to use them instead of actually using them.

A couple of days ago, I had a "vision" for a cookie recipe and I threw caution to the wind and used my last vanilla bean, but kind of hesitantly, because in the back of my mind, a vanilla bean should be used for a show stopping dessert like a cheesecake or a soufflĂ© or something.  But I'm pretty sure I made the right decision because these cookies were a HUGE hit.

My girl came by last night and ate one or six and then took some home to her family.  Then she texted me, "YOU NEED TO MAKE THESE COOKIES AGAIN, MOM, THEY ARE AWESOME!"  That made me feel good.

So if you are like me, just go ahead and get over it and break out the good stuff you were saving for a special occasion.   The good china.  Grandma's old lace tablecloth.  The vanilla beans.  Use them and enjoy them with your loved ones this Christmas.  Use them and enjoy them even when it's NOT Christmas.  Like on a regular Tuesday.  Or a Thursday.  Or whenever.  We can't take this stuff with us when we go, so let's make the most of our material things and enjoy them now with the ones we love.


Here are my notes:

--These cookies, like the name, are very vanilla-y, which is exactly what I wanted.  If you don't want to go out and buy a vanilla bean, then don't.  I think the 2 tablespoons of pure vanilla extract will give you a nice vanilla flavor.   But the vanilla bean does take them over the top.


--To scrape a vanilla bean, just slice lengthwise and then use your knife to scrape out the very tiny seeds.  Save that shell for vanilla sugar!

--To make homemade vanilla sugar, place a vanilla bean (the "used" vanilla bean after you have scraped out the seeds for another use) in some sugar.  I usually use a five pound bag to one vanilla bean.  Let it sit in your cabinet for days or weeks and the sugar will be infused with the vanilla.  Use it for all kinds of baking.  It's totally yummy.


--I rolled these cookies in a bourbon vanilla sugar I had from Rodelle (which I loved!).  But you could roll them in regular sugar, or homemade vanilla sugar.  Or not even roll them at all.  By the way, I didn't "roll" them into neat little balls with my hand, I just plopped them in the sugar with a cookie scoop and very quickly rolled them around.  They were still rough and irregular shaped.

Very Vanilla Chippers


1 cup butter, softened to room temperature
3/4 cup granulated sugar or vanilla sugar (made from putting a vanilla bean in granulated sugar and letting it set for a few days)
3/4 cup brown sugar
2 eggs
2 teaspoons white vinegar
2 tablespoons vanilla
The seeds from one vanilla bean
3 cups all-purpose flour
3/4 teaspoon salt
1 teaspoon baking soda
1 tablespoon cornstarch
1 (12-ounce) bag vanilla chips
Vanilla sugar or bourbon vanilla sugar for coating the outside of cookies

Preheat oven to 350 degrees.  Beat the butter and both sugars until light and fluffy. Add eggs and beat until mixed.  Beat in vinegar, vanilla and vanilla bean.  Mix together the flour, salt, baking soda, and cornstarch in a large bowl. Slowly add to batter and mix just until blended. Stir in the vanilla chips by hand until mixed. 

Place some vanilla sugar or bourbon vanilla sugar in a small bowl.  Using a small cookie scoop, drop the dough into the sugar, rolling it to coat all sides. Place on baking sheet about 1 1/2 inches apart.  Bake for 12-15 minutes or until cookies are set and light golden brown around.  Cool on baking sheet for 2 minutes before transfer to a wire rack to cool completely.  
Disclaimer:  Rodelle sent me a gift pack of vanilla products, but I was not asked to review or write anything about it.  All opinions are my own.


Pin It!

Monday, December 16, 2013

Butterscotch Poke Brownies with Toasted Almonds and Toffee Bits


Let me just go ahead and get all the goodies out of the way since it's Christmas and everything.  I'll return to real food after the holidays.

These brownies are simply decadent.  It took me several tries to get them the way that I imagined they should be in my head, but I think I finally succeeded.  They have a strongish coffee flavor in the base that works really well with the salted butterscotch sauce.  I poked holes in the brownies too, to let the sauce sink in.  Toasted almonds and milk chocolate bits give a crunchy texture to the top.


Here are my notes:

--You could totally leave out or adjust the espresso granules.  I think 2 teaspoons give them a good coffee flavor.  Or you could use regular instant coffee granules.

--Chill these well before cutting.

--Cut them small.  They are SUPER rich and sweet.  I would cut them even smaller than what is shown here.  Probably the size of a piece of fudge.

--I like dark cocoa powder, but you could use regular.

--You can use regular salt in the the butterscotch sauce, but be careful because it is more potent than sea salt.

Butterscotch Poke Brownies with Toasted Almonds and Toffee Bits


Butterscotch Sauce:
1/2 cup butter
1 cup packed dark brown sugar 
1 cup heavy cream
1 teaspoon fleur de sel or other sea salt
2 teaspoons vanilla extract

Brownies:
3/4 cup butter
3/4 cup dark baking cocoa
2 teaspoons instant espresso granules
1 cup sugar
2/3 cup light brown sugar
2 large eggs
2 teaspoons vanilla extract
1/2 teaspoon baking powder
1 teaspoon salt
1 1/3 cup all purpose flour

1 1/2 cups powdered sugar
1 cup toasted almond slices
1 cup milk chocolate covered toffee bits

Melt 1/2 cup butter in a medium heavy-bottomed saucepan over medium heat. Add 1 cup dark brown sugar, the heavy cream and 1 teaspoon fleur de sel.  Whisk until well blended. Bring to a gentle boil and cook for five minutes, whisking often.  Remove from heat and stir in two teaspoons vanilla.  Let cool completely to room temperature.
Preheat oven to 350 degrees.  Melt 3/4 cup butter in a large saucepan over medium heat.  Whisk in the cocoa and espresso granules until combined.  Remove from heat and stir in 1 cup sugar and 2/3 cup light brown sugar.  Whisk in the eggs and 2 teaspoons vanilla. Stir in the baking powder, salt, and flour, just until combined.  Spray a 13 x 9 inch baking pan with nonstick cooking spray.  Spread brownie batter evenly in pan and bake for 25-30 minutes or until toothpick inserted in center comes out with moist crumbs attached.  Do not over bake.  Let cool completely.

Using the end of a wooden spoon, poke holes in the brownie about 3/4 to 1 inch apart, all over the surface.  Measure out 3/4 cup butterscotch sauce and spread over the top of the brownies, pushing into each hole.  Heat the remaining butterscotch sauce over low heat.  Whisk in 1 1/2 cups powdered sugar until smooth, then quickly spread over the brownies.  Sprinkle with the toasted almonds and toffee bits.  Chill in fridge for at least 2 hours before cutting.  

Pin It!

Saturday, December 7, 2013

Peanut Butter Ball Stuffed Oreos


I couldn't stop at Martha Washington Candy Stuffed Oreos.  I had to keep stuffing, so I stuffed my all-time favorite Christmas candy into some Double Stuf ones.  Yes, they received all kinds of praise and are perfect for gift giving.  Read my notes below.


My notes:

--I had to use my fingers to pack the filling into the cookie around the edges and make it smooth.

--I used a level-packed small cookie/candy scoop to put the filling in the cookie.

--I used 2 packs of Double Stuf Oreos.  (They were actually a generic brand of the cookies.  So I guess I sit on a throne of lies according to the title, but you know you still call an off brand of coke, "Coke."  Therefore, I am justified.)

--I went through 2 packs of chocolate bark.  The first batch was really thick and really stuck to the cookies without dripping off a lot.  On the second batch, I added about a tablespoon of vegetable shortening while I was melting it and it was much smoother and thinner, which I liked.  There's a tip for you the next time you dip something.

--I would definitely leave these in an air tight container at room temperature.
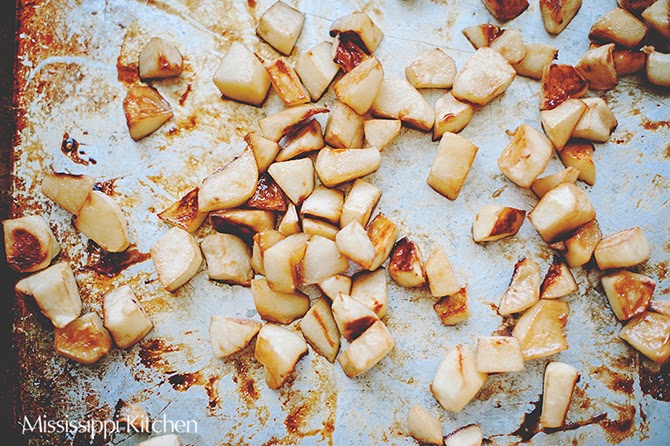
--This is the peanut butter ball filling I have been using for like 25 years or something.  (Lord have mercy, I NEVER thought I would be old enough to say that I have been using a recipe for 25 YEARS!) Yes, I always use pecans, which doesn't really make sense with the peanut butter, but you could use peanuts if it bothers you.  I chop them VERY fine in a mini food processor.  What I love about this recipe is the texture that the nuts and graham crackers give it.


Peanut Butter Ball Stuffed Oreos


1 cup butter, melted
2 cups smooth peanut butter
1 cup very finely chopped pecans or peanuts (I use pecans)
1 1/2 cups very finely crushed graham cracker crumbs
4 cups powdered sugar
2 (16-ounce) packages Double Stuf Oreos
2 packages chocolate bark or chocolate melting disks

Mix first five ingredients well.  Separate each cookie into two halves.  Using a small cookie scoop, scoop a level mound of candy mixture onto one of the halves and top with the other half, slightly pressing down and use fingers to smooth the edges and pack in the filling.  Repeat with remaining cookies.  Chill in fridge for about an hour.  Melt chocolate according to package directions.  Dip cookies in chocolate, letting excess drip off, and place on wax paper lined cookie sheet.  Place in fridge until chocolate  hardens.


Pin It!

Tuesday, November 19, 2013

Roasted Apple Salted Caramelitas

I think we all know that I am long overdue for a fattening fall treat on this blog.  The last three posts have been about vegetables and that's probably some kind of record for me.

I think these bars will satisfy your autumn sweet tooth.  I know they did mine.  I'm ashamed of how many of these I put away.  I will NEVER tell anyone how many I ate.

Never.  Ever.

Alright, I ate six.

In my defense, this recipe only makes a small 8 x 8 pan.  That is so not big.

Plus, there are apples in them.  An apple a day keeps the doctor away, I've heard.

Then there are the oats.  Oats are good for you.  [Feeling better all the time.]

I would take these over a brownie any day.  These were crazy good.  But I won't make them again for a long time because I simply cannot be trusted.

I am weak when it comes to caramelitas.  Weak and pitiful.  And selfish.

Read my notes if you decide to make them, because, you see, I have gone before you.  I have some things to say.

PS.  I did not eat six at one time.  I only ate four at one time, then I devoured the other two the next day.  I just didn't want you to think I was a pig.

PPS.  There are some {{{ADORABLE}}}} fall pictures of my grandson at the bottom of this post.  Because I can, you know. ;)


My notes:


--I used honeycrisp apples which is my new favorite variety.  Now, I know there are going to be some apple baking experts that are going to say that honeycrisps are not good for baking, but you know what?  I ate six.  Enough said.

--Let them cool.  Don't be like me and cut into them while they're warm.  Oh sure, they will melt in your mouth and make you think you have died and gone to heaven, but they will fall apart.

--These probably need to be stored in the fridge because of the apples, but let them come to room temperature before you eat them.  Or zap them in the microwave.


--I love roasting fruit when I add it to desserts instead of baking the fruit into them.  The fruit gets caramelized and that deepens the flavor.

--I added 1 teaspoon of fleur de del, but I really feel like I could have upped it.  Also, I think maybe sprinkling some salt on top would not be a bad idea.  And bacon crumbles.  I think bacon crumbles on this would be quite awesome.


Roasted Apple Salted Caramelitas


3 medium baking apples, peeled and chopped
2 tablespoons melted butter
2 tablespoons dark brown sugar

3/4 cup melted butter
3/4 cup dark brown sugar, packed
1 cup all-purpose flour
1 cup quick cooking oats
1 teaspoon baking soda
1 cup chopped, toasted walnuts, divided

1 (11-ounce) bag caramel melting bits
1/4 cup heavy cream
2 tablespoons butter
1 to 1 1/2 teaspoons fleur de sel

Preheat oven to 400 degrees.  Toss the apples, 2 tablespoons melted butter, and 2 tablespoons dark brown sugar together.  Spread on a baking sheet and roast in oven for 30-40 minutes or until tender and golden brown, stirring several times.  Set aside.

Combine 3/4 cup melted butter, 3/4 cup dark brown sugar, the flour, oats, and baking soda. Stir in 1/2 cup walnuts.  Pat half of the oatmeal mixture into the bottom of an 8 x 8 inch baking pan sprayed with nonstick cooking spray. Bake at 350 degrees for 10 minutes. 

Meanwhile, combine caramels, cream, 2 tablespoons butter, and the fleur de sel in a small saucepan over low heat. Stir until completely smooth.  When base comes out of oven, spread the apples over it, then the remaining 1/2 cup walnuts.  Drizzle evenly with the caramel.  Crumble remaining oatmeal mixture evenly over the caramel. Return to oven and bake for 15-20 minutes, until the edges are lightly browned. Do not over bake.  Remove from oven and cool completely before cutting.

*Store in fridge but they should be brought to room temperature before eating.

AND NOW FOR THE ADORABLE FALL PICTURES!!!!!!!!!


COULD YOU JUST DIE?!


Pin It!

Thursday, September 26, 2013

Espresso Kissed Cinnamon Chip Snickerdoodles


Let's talk about awkward for a second.

The other night, hubby and I were chilling in the living room.  He was watching TV and I was (of course) on the computer, working.

(And I think we all know that is code for social networking, but truly, I was also editing pictures in Photoshop, which, if you have ever done for a long period of time, can make your eyes begin to burn and head begin to throb.  That's why I have to change screens every now and then to Facebook and Pinterest, and check into my Instagram on my phone.  You know, to keep from going blind and developing a migraine.)

Anyway, I was getting a little bored, so I thought I would liven my night up by sending a really horrendous Snapchat to my sister, who will usually answer me back with another completely hideous Snapchat, and then we'll laugh and laugh and laugh like we are in high school again.  (And then my husband who does *not* do any kind of social networking at all, will say "What is so funny?")

I know.  It's hard to believe I'm 43 and a grandmother, huh?

So I grabbed my phone and began to contort my jaw line so my chin would resemble Jabba the Hutt, and just for an extra measure of fun, I thought I'd throw in a bit of a nostril flare close-up.  All this without a stitch of make-up on, which would normally soften the blow.  That's when I glanced over and saw my husband staring at me.

That certainly killed my moment.

After all these years, there are still some things about me that I would rather him not see, and me sending a daily ugly to my sister is at the top of the list.

And to make matters worse, he didn't even ask me what in the world I was doing.  He just looked at me with no expression.  Then he looked back at the TV.  I'm pretty sure in disgust.


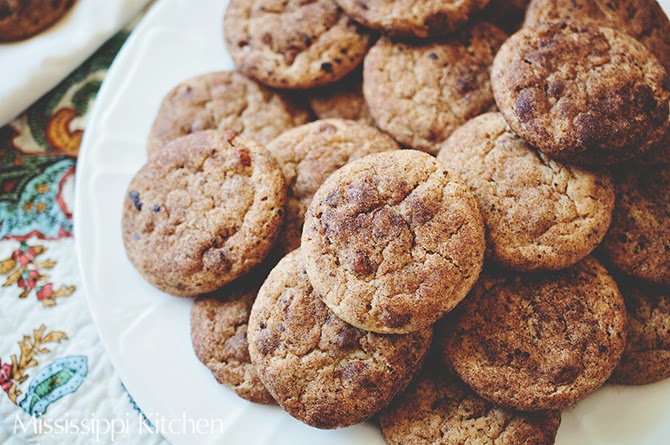
So since I am obviously such a mature grown-up, I'll give you my latest "grown-up" version of Snickerdoodles.  Snickerdoodles to me are, well, nothing to rave over.  They are kind of plain, and in all the recipes I have seen, none of them had cinnamon IN the dough, which I don't get. My Snickerdoodles have my all-time favorite combination in them--coffee and cinnamon.  Man, I love that combo.  I also added cinnamon chips to make them extra good and soft.   These scream fall to me.  Unfortunately we are still in the upper eighties here.  Blah.  But I am ready for that first cool day.

PS.  I use my Snapchat for constructive things too.  Like this evening when I wanted to give good counsel to someone.  I think my crazy eyes *really* drive home the point.
.


Here are my notes:

--These have subtle coffee flavor, at least to me, so you could increase the amount easily if you wanted.

--I baked my batches for 12 minutes, but I wish I would have taken them about between 10 and 11 minutes, just for some extra softness.  But they still had soft, chewy middles and crispy edges.

--I know someone is going to post that these aren't real Snickerdoodles because the don't have cream of tartar.  But I can call them Snickerdoodles if I want.  My blog.

--I used a bag of Hershey cinnamon chips.


Espresso Kissed Cinnamon Chip Snickerdoodles


2 3/4 cups all-purpose flour
1 teaspoon baking soda
1/2 teaspoon kosher salt
1/2 cup shortening
1/2 cup butter
1 1/2 cups, plus 3 tablespoons sugar, divided
2 large eggs
1 teaspoon, plus 1 tablespoon cinnamon, divided
4 teaspoons instant espresso granules
1 (10-ounce) bag cinnamon chips

Preheat oven to 350 degrees.  
Stir together the flour, baking soda, and salt.  Set aside.  Beat the shortening, butter, and 1 1/2 cups sugar on medium-high speed until fluffy.  Beat in the eggs and 1 teaspoon cinnamon.  Place the instant espresso granules in a small bowl, and with the back of a spoon, crush them into a fine powder.  Beat in half the powder until well mixed.  Beat in the flour mixture until dough forms.  Stir in the cinnamon chips by hand.
Place 3 tablespoons sugar, 1 tablespoon cinnamon, and the remaining ground espresso in a small bowl and stir until mixed.  Shape into 1 1/2 inch balls and roll each ball in the sugar mixture, then place on an ungreased baking sheet about 2 inches apart.  Bake for 10-12 minutes or just until cookies are set and light golden brown around edges.  Cool for 2 minutes on baking sheet, then transfer to a wire rack to cool completely.  Approximately 4-5 dozen.  


Pin It!