Showing posts with label Sides. Show all posts

Monday, April 7, 2014

Easy Cheesy Scalloped Potatoes


These.  These are better than the box variety, I promise. And they're not hard to make. Basically, it's like making macaroni and cheese but with potatoes. No biggie. Except it will be big to your family who will appreciate you just a little more.

And you know you could use some appreciation.

Yeah, me too.  *hugs*

This is such a simple, basic, but delicious recipe.  You can even make it ahead of time and store it in the fridge until you're ready to bake it.  (See my notes.  I have a note about that.)

Listen, friends don't let friends eat scalloped potatoes from a box.  They just don't.


My notes:

--You can use all milk if you'd like.  I have before.  But I prefer part half and half and, yes, I can tell the difference.


--I have actually assembled this the day before and stored it in the refrigerator to bake the next day.  Be aware that salting the potato layers is going to pull out a lot of water from them overnight, though.  Mine were very watery the next day when I put them in the oven, but the water did cook out and they tasted great.

--This is just a basic, although delicious, recipe.  There a a million things you could add.  Parsley thyme, onions, garlic, chives, bacon, ham, different cheeses...the list goes on and on.  Do something wild.  Or not.


--I much prefer to shred my own cheese from a block than to buy pre-shredded cheese.  I think it melts much better and the shredded cheese in the packages just seems waxy and weird to me.

--You are going to have to cook this until the potatoes are tender, and that is going to probably be over an hour.  Just stick a fork in them to make sure their done.


--Let this cool and sit for at least 20 minutes before you serve it.  This is really important because A) this stuff is scalding hot, and B) the sauce will be super runny and it will thicken a little as it cools.

--The thinner the slices, that faster it cooks.  Slice them as evenly as possible.


Easy Cheesy Scalloped Potatoes


1/4 cup butter plus extra for buttering the baking dish
1/4 cup flour
2 cups whole milk
1 cup half and half
3 1/2 cups shredded sharp cheddar cheese, divided
Kosher salt and coarsely ground black pepper for seasoning
3 1/2 pounds potatoes (russet, red or golden) washed and scrubbed, peeling left on

  1. Preheat oven to 400 degrees.
  2. In a large, heavy saucepan, melt 1/4 cup butter over medium to high heat; add flour and whisk for 1 minute.  Gradually whisk in the milk and half and half; continue to cook over medium to high heat, stirring constantly, until thickened and bubbly.  Stir in 3 cups of the shredded cheese until melted.  Season with salt and pepper to taste.  Remove from heat.
  3. Meanwhile, slice potatoes thinly, no more than about a 1/8 of an inch thick.  Generously butter a 13 x 9 inch or equivalent size baking dish.  Place 1/3 of the potatoes in the bottom in an even layer.  Season with salt and pepper.  Pour 1/3 of the sauce evenly over the top.  Repeat twice, then sprinkle the top with the remaining shredded cheese.
  4. Bake for 60-75 minutes OR until potatoes are fork tender all the way through and the top is golden brown.  (If top starts getting too brown before the potatoes are tender, cover with foil.)  Let cool for about 20 minutes before serving.


Pin It!

Monday, October 28, 2013

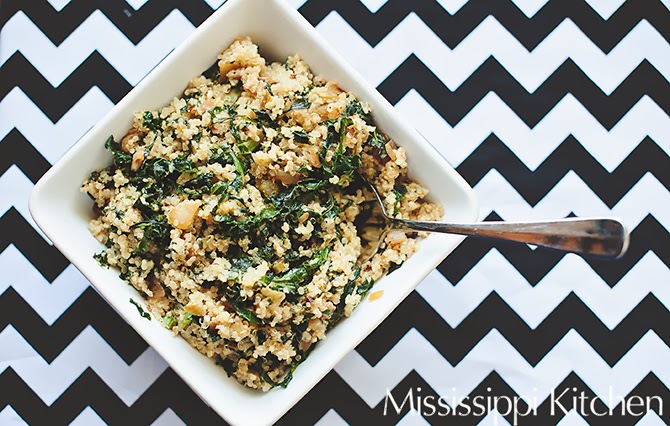
Kale with Balsamic Bacon Butter and Quinoa


I've made this dish about five times in the last month.  It's one of the few foods coming from my kitchen lately that I actually cook.  I am in the middle of a very busy photography season and I am swamped with a capital s.

Things here are cray cray.

This dish is pretty straight forward and simple, but BIG on taste.  Seriously.  If you  think you don't like kale, you should try it like this.  Yes, I could have added more bacon, more balsamic, etc, but you can if you want.  I am too rushy rushy at this time in my life and I need simple.  I loooove the caramelized onions in it.


Here are my notes:

--The shredded kale is found at Walmart by the salad mixes.  Love, love, love this new find!  Pre-washed, pre-shredded.  Yes, please.


--Those big globs above are the bacon balsamic butter that comes in the bag with the kale.

--I eat this cold too, right out of the fridge like a salad.

--Put as much onion as you want.  Put as much quinoa as you want.  Sometimes I just make a batch of quinoa which is 1 cup dry quinoa to 2 cups water, and sometimes I cook more.  It's not baking, it's throwing stuff together in a pan.


--I keep saying that toasted nuts would work well in this.  I'm thinking pine nuts.  What do you think?


Kale with Balsamic Bacon Butter and Quinoa 


1 tablespoon extra virgin olive oil
1 tablespoon butter
1 medium to large onion, chopped
2-3 teaspoons minced garlic
1 (10-ounce) bag shredded kale with balsamic bacon butter (found by the salad mixes)
1/4 cup water
3-5 cups cooked quinoa (1 cup quinoa yields 3 cups cooked) 
Kosher salt and coarsely ground black pepper

Place the extra virgin olive oil and 1 tablespoon butter in a large skillet over medium heat.  Add onion when butter is melted.  Cook until golden brown, about 10 minutes, stirring often.  Add the garlic, then add the bag of kale with balsamic butter.  Add a 1/4 cup of water to the skillet and place a lid on top.  Cook for about 10-12 minutes until kale is tender, stirring several times.  Remove from heat and stir in the cooked quinoa.  Add salt and pepper to taste.


Pin It!

Monday, September 2, 2013

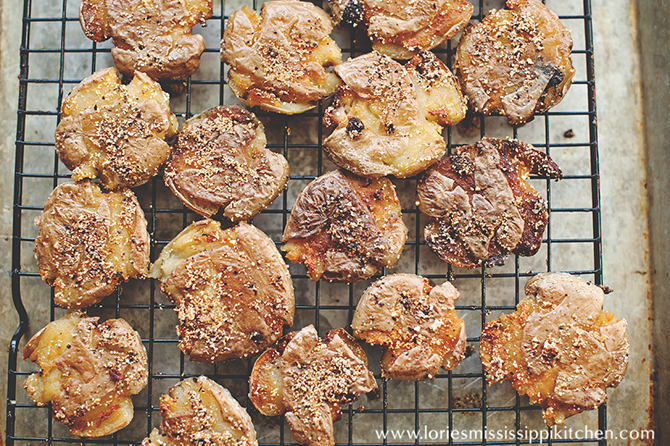
Cornmeal Dusted Crispy Smashed Potatoes


I had a totally awesome potato dish at a restaurant in Franklin, Tennessee this past spring.  The potatoes were boiled and smashed, then fried to a perfect crispy texture with a chimichurri sauce drizzled on them.  I kept telling myself I would try to recreate the dish at home, and I finally got a pocket of time a couple of weeks ago.  To add just a bit of oomph, I did what my grandmother used to do to her fried potatoes while I was growing up, which was to coat them in cornmeal.  They may not be all that pretty, but they are simple and delicious.


Here are my notes:

--Be careful when smashing them that you don't smash them too much.  They will break apart and they need to stay together.


--Do NOT overcrowd the skillet.  They will brown much faster if they are not overcrowded.

--Measurements are approximate.  There is no exact science here, just a little method.

--Yes, a variety of sauces and toppings would work on these.  Chimichurri, salsa, etc. would all be good drizzled on top.  I just left mine crispy and plain the day I cooked them.  A dollop of sour cream and bacon bits would definitely not be awful.

--There might be some cornmeal build up in the skillet that will burn after a couple of fryings, so watch it and scrape it out and add new oil as needed.

--I used a bag of very small, round, yellow skinned potatoes, but red would work too.

Cornmeal Dusted Crispy Smashed Potatoes


1 pound very small yellow or red new potatoes (or however many you want) 
1/2 cup butter, melted
Kosher salt and coarsely ground black pepper to taste
Yellow cornmeal (not cornmeal mix)
Vegetable oil for frying

Place potatoes in a large pot and cover with water.  Cook over medium high heat until fork tender.  Remove from water and place the potatoes on a baking sheet.  With a flat bottom glass or cup, gently smash the potatoes to flatten, being careful not to flatten too much or they will break apart.  Let them cool for about 15 minutes.  Spray the bottom of the glass with nonstick cooking spray if it starts to stick.

Brush the potatoes with melted butter, then season with salt and pepper.  Sprinkle with cornmeal.  Turn over and repeat on other sides.  

Pour oil to  depth of about 1/4 inch in a large cast iron skillet.  Heat over medium-high  until very hot.  Place 5-6  potatoes a time in the hot oil, being very careful not to crowd them.  Cook until golden brown and crispy, turning once.  Set aside on a baking rack that has been placed over a baking sheet to drain oil.  


Pin It!

Saturday, March 23, 2013

Quinoa with Broccoli, Toasted Almonds, and Browned Butter

I did it.  I got all brave and I finally opened the package of quinoa I had had in my pantry for a month.  Now, I was expecting it to have the texture of little pieces of wood or something, but the texture was quite pleasing.  Nothing off-putting about it at all.  The taste was good too.  (Not cookie dough-on-a-stick good, but really good for a grain.)  In fact, I normally cook with brown rice and just for the record, quinoa kicks brown rice's butt.

There.

And it was so fast compared to brown rice too.  Just 12 minutes.  And not sticky at all. And my sources say it's extremely healthy.  As in, not just a little bit healthy, but extreeeeeemely healthy.  Something about complete proteins or something.  I don't know.  Look it up.

I struggle with side dishes.  Side dishes are the thorn in my...side.  It's like I get side dish amnesia when I'm cooking dinner and I just don't know what to put with my main dish.  I threw this together in no time flat and it was good, really good.  I'm calling this a side dish, but I did, in fact, eat this for lunch one day, so really it could be anything you want it to be.

 Here are my notes:

-Basically, this is just more of an idea and less of a recipe.  Add what you want, how much you want.

-I used frozen broccoli because that is what I had, but I feel like roasted, fresh broccoli would have been better.  You do it, kay?

-Don't forget the salt.  It just needs salt.


Quinoa with Broccoli, Toasted Almonds, and Browned Butter


1 cup quinoa, cooked according to package directions
1 (16-ounce) package frozen broccoli heads, cooked according to package directions
1/3 cup toasted sliced or slivered almonds
3 tablespoons butter
Kosher salt and black pepper to taste

Place the quinoa, broccoli, and almonds in a large bowl and toss.  Melt the butter in a small skillet and cook over medium to high heat until butter is foamy and golden brown and nutty smelling, about 3-4 minutes, swirling butter in pan several times.  Pour over the quinoa and toss to evenly coat.  Season to taste with salt and pepper.


Pin It!

Monday, August 13, 2012

Chicken and Pecan Wild Rice Pilaf

It is SO hard to get back into the swing of things after a long vacation.  Hubby and I have been gone for a week long "culinary" tour of the mountains.  Yes, we ate our way through Mississippi, Alabama, Tennessee, North Carolina, and Georgia.  Then home again, home again, jiggety-jig.

Or should I say jiggety-jiggle?

More to come on all that later, WITH photos I might add.  

I know.  You're hanging on the edge of your seat, right, to see my vacay photos?  Be patient, my peeps.  I'll get to it.  And that's a threat promise.


Before we left, my totally awesome husband planted me a field of sunflowers for a fall crop.  I'll keep you posted on their development.  So far, not much.  But we dream big.

Ahhh, fall.  I eagerly await your arrival with outstretched arms. 

Changing the subject, here are two food products I just LOVE.

First off, this rice:


This rice is a blend of white, brown, wild, and red.  I love this but have to get it when I am out of town at Publix.  It only takes 15 minutes to cook and makes the perfect side dish. 

And this chicken:


I can actually get these at my hometown Wal-Mart.  I love them because they don't have all that nasty injected stuff that other chicken breasts have.  They come from humanely raised chickens and are raised cage free.  Yes, they are well over twice the cost of regular chicken breasts but this is one of the areas where I splurge.  We're definitely not vegetarians in my house but I do have concerns about the processing of chicken and beef nowadays.  I just don't think it's healthy when a single chicken breast weighs 10 ounces.  When I go out of town, I have been able to get the boneless chicken thighs in this brand and I love those too.

So here is my easy recipe that combines the two.  Simple, healthy, quick.  When served hot, it's a rice pilaf.  But it can also be served cold as a salad, which was actually my favorite way.  

Here are my notes:


-Make sure you toast the pecans.  It will make all the difference in the world.

-I like to cook the veggies just until crisp-tender.  I like the celery to have a bite to it.

-I almost always add a couple of chicken flavored bouillon cubes to my cooking rice.  It just adds so much flavor.

-I grilled my chicken breasts in a grill pan and used an all-purpose Greek seasoning.  You could use any seasoning you'd like.

 
Chicken and Pecan Wild Rice Pilaf


1 cup uncooked wild rice blend
2 chicken flavored bouillon cubes
1 medium onion, chopped
2 celery stalks, chopped
2 tablespoons butter
2 boneless, skinless chicken breasts, grilled, then cubed into bite size pieces (I used an all-purpose Greek seasoning to season mine)
3/4 cup chopped, toasted pecans
Salt and pepper to taste

Cook rice according to package directions adding bouillon cubes to water.  Place in a large bowl when done.  Sauté the onion and celery in 2 tablespoons butter over medium heat until crisp-tender; add to the rice.  Add chicken and toasted pecans to rice and stir until mixed.  Season with salt and pepper to taste.  Serve warm as a rice pilaf, or cold from the refrigerator as a rice salad.


Pin It!

Wednesday, June 13, 2012

Italian-ish Squash Casserole

My week so far has been good.  Except for a tiny, little, near-death experience, it has been good.

And I will *not* be embarrassed one bit for calling an ambulance to come get me because I thought I was having a heart attack yesterday.  Every person who thinks they are dying should definitely call an ambulance.  That's just the right thing to do.

I am, however, utterly and completely MORTIFIED at my attire and lack of proper hygiene.  (In my defense, I was just about to go outside to have a hot and sweaty work day.  And tell me why should I shower for that?)

But when my heart suddenly started pounding out of my chest and I was gasping for air and the room was spinning and growing darker by the second, raggedy clothing and the extra layer of plaque on my teeth seemed completely irrelevant.

It didn't hit me until ten minutes later when the ambulance crew arrived and my heart had settled down and my breathing had returned to almost normal, that complete strangers were there to take me out of my home and out into the world where other strangers and possibly people that I actually knew would be seeing me face to face.  Did I really want to do this?

But somehow an "U-hm, nevermind. I'm okay now, guys." just didn't seem appropriate.  It was too late.  I was committed even though I had on the grungiest pair of yoga pants ever and a baby blue bass t-shirt that my husband had bought back in the eighties.  (In my defense, it's really soft and comfy.  Probably because it's threadbare.)

Plus, I was beyond scared.   I don't want to make light of that.

Even though I'm making light of that.  It's the way I deal with my own afflictions. 

So I had some kind of scary, weird episode with my heart.  It wasn't a heart attack and I will be following up with my doctor *for reals* next week.  And I will be showering even before I go mow now and shopping for much nicer yoga pants to wear around the house.  The kind that I would be proud to wear in public if the need arises.  Which I hope it won't.  But you never know.

So enough about my health problems.  Let's talk about squash.  I love it. I bought two big boxes of it last week to put up in the freezer.  And I was all happy and stuff because my hubby is always saying how much he likes those "old-fashioned vegetables" like the kind he ate as a child when he and his family had a great, big garden, so I was all "Babe, I have squash!"  And he was like "Squash is okay, but it's not my favorite."  It turns out snap beans rank much higher on his list.  Still, I wanted to make a squash recipe that would really knock his socks off, but yet be comforting and remind him of his childhood, so I made some slight changes to a regular old squash casserole.  And you know what he said to me?  He said, "Lorie darling [he calls me Lorie darling sometimes], the next time we have a get together anywhere, you should bring this."

Score.

Here are my notes:

-I used about 8 heaping cups of chopped squash, which sounds like a lot but I was able to fit it all in a 9 x 9-inch square casserole dish.  It was two really large squash and one medium.

-I am loving Progresso's Italian flavored panko crumbs. 

-I used fresh Parmesan cheese which I shredded myself. 

-If I had thought about it at the time, I might have added in some chopped fresh basil. But I didn't think about it.  Plus, my basil plants are struggling. :(


Italian-ish Squash Casserole


3 tablespoons extra virgin olive oil
2 tablespoons butter
8 heaping cups chopped yellow squash
1 large onion, chopped
1 cup shredded Parmesan cheese
1/2 cup mayonnaise
Kosher salt and coarsely ground black pepper to taste
1 cup Italian style panko bread crumbs
3 tablespoons melted butter

Preheat the oven to 350 degrees. Spray 9 x 9 inch casserole dish with nonstick cooking spray.

Heat the oil and 2 tablespoons butter in a large skillet over medium heat. Add the squash and onion, and cook until squash is crisp-tender. Transfer to a large bowl and stir in the Parmesan and mayonnaise. Add salt and pepper to taste.  Pour into casserole dish.  Stir together the panko crumbs and 3 tablespoons melted butter and sprinkle on the squash.  Bake for 20 minutes or until the top is golden brown and bubbly. 


Pin It!

Thursday, October 22, 2009

Orzo With Basil Pesto

This is an easy, quick side dish that I make often.  No, it will not change your life, but it's good. I like to serve it with grilled chicken or fish.  And guess what, my hometown friends?  Wal-Mart has orzo now.   Check the pasta section.  

It's so easy, you don't even have to have a recipe.  Just cook some orzo (as much as you want) according to the package directions.  Drain all the water.  Drizzle with a little bit of extra virgin olive oil.  Stir in some pesto (as much as you want-a little goes a long way).  The pesto has olive oil in it but I found the orzo needs a little extra olive oil drizzled into it to make it stir better.
 
So to recap: 

Cook (orzo)

Drain (water)

Drizzle (olive oil)

Stir (in pesto)

Pin It!

Friday, February 13, 2009

Marinated Green Beans

This recipe was given to me by my friend Tammy and I just love it.  I seem to struggle with what to serve as side dishes with my meals and this recipe helps solve that problem.  It's super simple and can be made ahead of time, which I love.  I would never, ever make this for my dear sister, though, because she doesn't like her vegetables "sweet"; I, however, like that sweet and savory combination, so this recipe is a real keeper in my book.

Marinated Green Beans

4 (14-ounce) cans French cut green beans, drained

1 cup melted butter

3/4 cup light brown sugar

2 tablespoons soy sauce

4 slices bacon, cut in half

  1. Place green beans in a 13 x 9-inch casserole dish.  Whisk together the butter, sugar, and soy sauce.  Pour over green beans.
  2. Place the bacon over the green beans and marinate overnight.
  3. Bake at 350 degrees for about 30 minutes or until bacon is done.
Pin It!

Saturday, October 25, 2008

Jennifer's Italian Salad


Every time I take this salad to any get-together, it disappears within the first few minutes; everyone loves it. 

This recipe comes from one of my relatives on my husband's side of the family, Jennifer.  She always makes this salad for our family reunions and I can't get enough of it.  She shared how to make it with me a few years ago and I've been making it ever since.  Thanks, Jennifer!  You have know idea how much joy you have brought to my life by giving me this recipe.

The total cost of ingredients can be a little pricey, so this is something I usually make for special occasions.  I do, however, use a store brand of olives to cut the costs a little.  You could certainly make your own croutons with day-old bread.  Also, buying a big hunk of Parmesan cheese is usually cheaper than buying the pre-shredded kind.

Jennifer told me that the key to this salad is to use a zesty Italian dressing.  I just do what she says.

Jennifer’s Italian Salad

1 (16-ounce) bag hearts of Romaine or Italian blend lettuce

3-4 chopped Roma tomatoes

1/2 cup chopped red onion

1 to 1-1/2 cups whole green olives with pimientos, drained

1 to 1-1/2 cups whole black olives, drained

1 (6-ounce) container crumbled feta cheese

3/4  to 1 cup shredded Parmesan cheese

1 small jar or about 1/4 cup capers, rinsed and drained

1 bag restaurant style croutons

1/2 to 3/4 cup bottled Zesty Italian dressing

  1. Place the first 8 ingredients in a large salad bowl and toss.
  2. Right before serving, drizzle with the Italian dressing and add croutons, then toss to combine.
Pin It!

Tuesday, July 15, 2008

John's Potato Casserole...an adventure into the world of store brands.


Warning:  This post will bother you if either of the following are true...

A.  You would never buy the store brand of cream of mushroom soup.

B.  You would never buy cream of mushroom soup, period, store brand or otherwise.

Foodies, hide your eyes.  This may hurt.

Several years ago, my sister invited me to her house for dinner.  Her husband John, my beloved brother-in-law, made a wonderful potato casserole.  I asked for the recipe for sometime and he finally sent it to me in rough email form, which I have retyped in recipe format.  I think it is the perfect recipe to demonstrate how tasty store brands (a.k.a. off-brands or generics) can be.  I have a theory that if you use enough store brands in one recipe, they bind chemically and eliminate any adverse flavors that existed in their original state.  I call this masking

Actually, I just made that up.  But it sounds reasonable.

Now I'm not saying that I buy off-brands exclusively, but I have broadened my horizons since my twenties.  Or maybe it's that I've lowered my standards.  In either case, I have experimented over the years with these frowned upon products, and I pretty much know what works and what doesn't.  Buying store brands is an easy and quick way to save a little money.

If you haven't used store brands, give them a try.  Trial and error is the best way to discover what works and what doesn't.  Some are better than others and sometimes only the name brand will do.  I can't think of an example right now, but I'm sure its true.

I will get to rice and beans soon enough.  Here's the potato casserole:

John’s Spinach Potato Casserole

1 (10.5-ounce) can cream of chicken soup

1 (10.5-ounce) can cream of mushroom soup

1 (16-ounce) container sour cream

Salt and pepper to taste

1/4 to 1/2 cup chopped green onion

1 tablespoon minced garlic

2 (10-ounce) packages frozen spinach, thawed and excess water squeezed out

2 (24-ounce) bags frozen, shredded hash brown potatoes

16-ounces Monterey Jack cheese, shredded

1 to 1-1/2 cups dry bread crumbs (Italian or regular flavored)

1 stick (1/2 cup) melted butter

  1. Whisk together both soups, sour cream, salt and pepper until combined in a very large mixing bowl. 
  2. Stir in the green onion, garlic, and spinach. 
  3. Stir in the potatoes. 
  4. Spread half this mixture in a large casserole dish (I used a 15 x 11-inch glass baking dish) that has been sprayed with nonstick cooking spray. 
  5. Sprinkle evenly with the cheese.  Spread remainder of potato mixture on the cheese. 
  6. Sprinkle the top with dry bread crumbs and drizzle the top with the butter.  Bake at 400 degrees for 45-60 minutes or until golden brown and bubbly.  Let stand 15 minutes before serving.
Pin It!